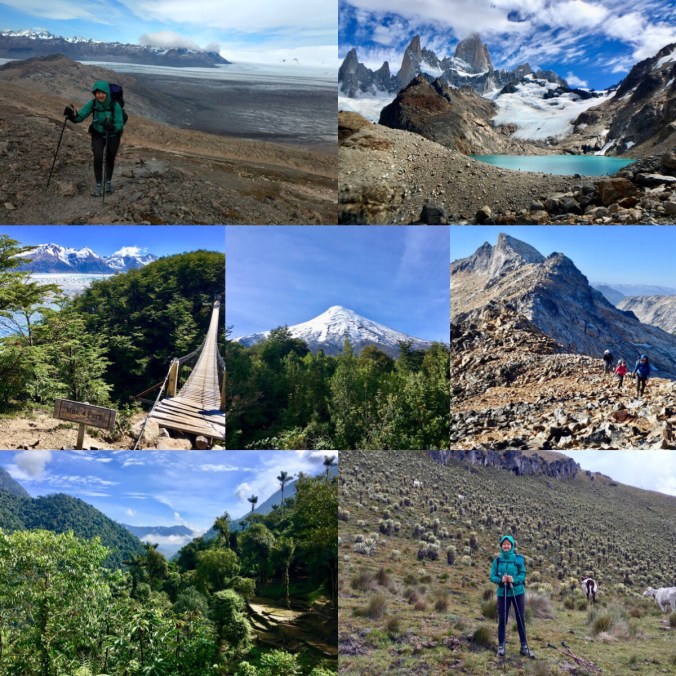
I am now 4 months into my 6.5 months journey. Even though it might seem that way, I am not traveling for the sake of traveling. This entire trip has been built around a quest to become a more experienced hiker in order to do more physically and mentally demanding routes. Over the last 4 months I’ve taken on several backpacking trips, each presenting its own set of challenges and giving me unique takeaways to be applied in the future.
These are in order:
Huemul Circuit (Argentina): Extreme wind
Laguna de Los tres (Argentina): Solo overnight backpack
Torres Del Paine (Chile): Hiking on my own for multiple days
Osorno volcano (Chile): Not a multi day hike but it taught me some snow skills
5 laguna traverse (Argentina): Extreme exposure to heights
Ciudad Perdida (Colombia): Heat and humidity
Los Nevados (Colombia): Rain and mud
I have one more 4 day backpacking trip in Utah (and several day hikes) coming up that will test all that I have learned plus navigational skills before I start on the John Muir Trail in an epic snow year. I had initially planned to start in August, as most sensible people would. But a change in plans in my ‘real life’ forced me to start in early July instead, when the lingering snow on high passes and stream crossings would be challenging in a regular year, let alone an epic snow year. Yet my intuition tells me that it was the right decision. In the age of global climate change, California has gone from winter to summer over the course of 2 weeks. Heavy snowfall has now been replaced with heatwaves and soon, wildfires will once again be inevitable. It’s possible, with caution and training, to tackle snow and stream crossings but wildfires will end my hike decisively. That’s how I justify starting in July instead of August. And also, with all the hiking over the past few months, I have never been more physically fit. I’m (almost) ready!
Of course, this whole trip is not entirely about hiking. Along the way, I got to see incredible wildlife in their natural habitats, experience new cultures, drink fine wine, satisfy my taste buds and catch up with old friends. 4 months down. 2.5 more months to go. And I cannot be more excited!
I first visited the Torres Del Paine National Park in Chilean Patagonia in December 2014. I had intended to complete the ‘O’ circuit then until a bad flu and a foot injury derailed those plans. I did manage to visit the 2 most popular attractions in the park – the base of the towers and the French valley lookout. Still, I felt that was little consolation for my inability to complete the circuit. Through the years, it has always been in the back of my mind to return one day to finish what I started.
Since I have now left my job to travel for a few months, this was the perfect time to return to Patagonia. March is also purported to have more pleasant weather than December i.e. less wind and rain. This post chronicles my 8 days on the circuit – the highs and lows and my thoughts for the day – in hopes that my experience would be useful background information to some planning a trip to this amazing park.
Tip: Whatever you thought of the wind in Patagonia, you thought less. Pay to stay and eat in the Refugios. A lot of people carry all their gear and food (for 8 days!) and camp, either to save costs or due to a misplaced optimism that they will be able to do it without too much pain (or, as I found out later, simply ignorance that accommodation and food are available the whole way). Many start regretting it very soon. It’s ok to camp in the wilderness or where there are few facilities; it’s miserable to camp beside a warm place (i.e. the Refugios). It’s also very frustrating to pitch your tent when the wind is gusting, which it almost always does in the afternoon. Be smart – spend the money to do the trek ‘luxuriously’.
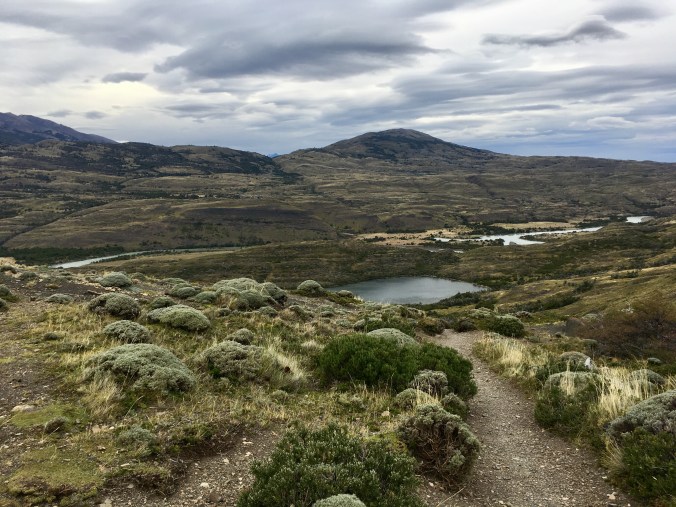
Day 1 Central to Camp Seron
View on the way to Camp Seron
Today was a warm up day. I went up and down a hill (+200/-200m) slipping and sliding on mud a lot of the time. I also gave up trying to keep my shoes dry. Very happy I decided to go with non waterproof shoes so they dry fast. Reached camp at 2pm. I paid to rent a tent, sleeping bag and pad on site (there was no Refugio at Camp Seron). I was rather impressed with the facilities. The tent was so spacious I could half stand in it.
My huge tent at Camp Seron
The sleeping bag and pad (more like mattress) were both clean, thick and comfortable. The weather today was ridiculously good. Blue skies and a gentle breeze. Certainly a big departure from my first visit 4 years ago when it was overcast and blowing snow. Now if only the weather will stay this way for the rest of the trip…
Day 2 – Camp Seron to Refugio Dickson
I woke up to find out that a rodent had been chewing on the cork of my hiking poles in the night! I never thought that my poles would be unsafe in the tent vestibule. Alas, this is another battle scar on my gear, which make them (and therefore me) look bad-ass!
I started hiking at 8am and seemed to be the first one on the trail. Why does everyone else seem so unhurried? I didn’t get it. The sun’s fully up, you’ve had your breakfast, it’s time to move! The day started overcast but the sun came out later at around noon. At least there was no rain! The trail was flat-ish initially then started climbing.
At the top of the hill
I caught up to another hiker at the start of the steepest section. He was carrying a lot more stuff than I and so was naturally slower. The descent was steeper than expected – and I thought this was an easy (but Iong) day! Soon I arrived at the ranger station and was the first one to sign the trail register for the day – whoopee! I think this is the first time that has ever happened. According to the ranger, Refugio Dickson was only an easy 9 km away. After a short break, away I went.
The trail was largely unremarkable until about 2km from the Refugio when I saw what looked like fresh puma poop in the middle of the trail. Uh-oh. I’m alone and the first person to walk this section of the trail today – the stuff horror movies are made of. I suddenly became very aware of my surroundings. To my surprise, I was now surrounded on both sides by tall grass – the perfect hideout for a puma stalking its prey. I tried hard to remember all the advice I read about what to do if I encounter a puma. Am I supposed to stand still, look big or turn and run (ok, I know the last one is definitely wrong!). I hiked as fast as I could to get out of that area. In about 30 minutes I crested a hill and there lay in the valley below, Refugio Dickson. Yay I’ve arrived!
Refugio Dickson, the ‘promised land’
Still the first one and clocking in at 5.5 hours instead of the 6 hours indicated to get there from Seron. Today I will not be a puma’s lunch and dinner and live another day to tell the tale.
Day 3 – Refugio Dickson to Camp Perros
Today was a relatively easy day of climbing through the forest for about 3 hours. The challenge came in the last 30 minutes or so on a rocky, exposed path.
Glacier mirador near Camp Perros
I arrived at camp in 3 hours 45 minutes, shaving off 45 minutes the recommended time. I was the second one to sign the trail register today – darn it I lost my streak! Tomorrow is the big push up John Gardner Pass and an even bigger descent of over 1000m all the way to Refugio Grey. I pray my knees will hold up and that I make it to Grey before nightfall. Now time for some R&R for the rest of the day…
Day 4 – Camp Perros to Refugio Grey
I woke up at 5.15 today, intending to start walking at 6.30. I finally started at 6.35 – quite on schedule! I have been obsessing over today’s weather forecast. I need it to be good because I’ve been reading these blogs talking about white out conditions at the pass (and I have personally experienced white out conditions on a pass, at 5000m in the Himalayas no less. I would like to avoid another encounter if possible). Before I left, I looked up at the sky and it was blanketed with stars. ‘Good’, I thought, ‘at least there will be no rain or snow. Please hold off on the wind gusts too’.
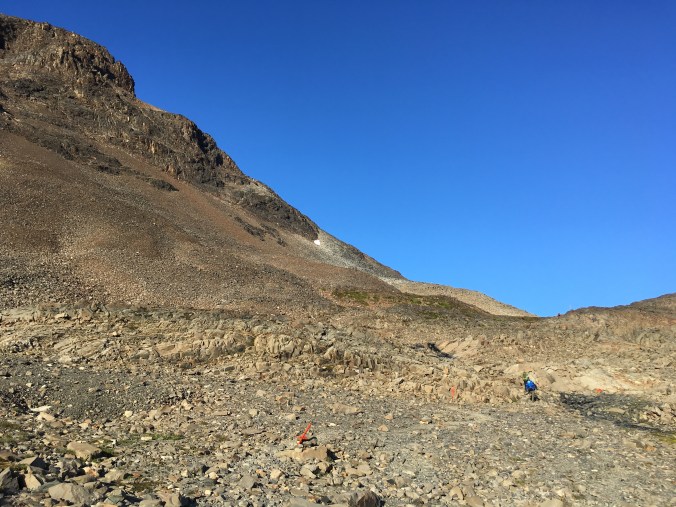
The first hour or so was spent side-stepping mud. Thankfully the weather has been dry for a few days. If it had been raining, we would be trudging in mud that was ankle-deep, if not more. After an hour or so, the pass came into view.
The pass is behind that depression in the middle. Doesn’t look so bad from here.
By this time, the sun had risen and there was not a cloud in the sky. What good fortune! After a hard slog, I finally reached the top of the pass.
Me standing at the top of the John Gardner Pass
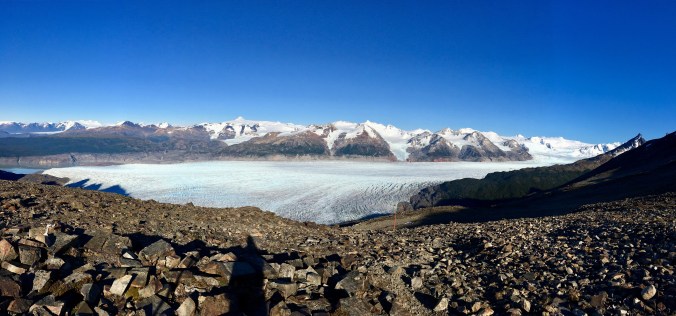
The view of the South Patagonian Icefield was magnificent but it was apparent that there was a better viewpoint about 5 minutes downhill.
I have no idea why most people decided to chill at the top while there were only a handful of people at that viewpoint. I slowly made my way down.
When I got to the viewpoint, even the handful of people there previously have left so I was all alone, with the whole place to myself. I sat down and pulled out a snack. As I snacked, I started to smile and then laugh and then mumbled ‘praise the Lord!’. All that time I spent worrying about life-threatening conditions descending this pass and here I was sitting in front of the most incredible view under clear blue skies and there was barely a breeze.
View from a point immediately below the pass
This day I had to make it all the way to Refugio Grey, 22km in total and having skipped Camp Paso in my determination to glamp it the whole way (there are no facilities at Paso). So after 10 minutes or so of staring at the view in awe, I started making my way down. The way down was not particularly steep, especially as the park did a great job of cutting in steps and placing ladders wherever the trail might have been dodgy. But it was long, really long. My knees hated me today.
After 2 hours, I got to Camp Paso. It was a small place with a drop toilet and lots of mosquitoes. Glad I decided not to stay and to go all the way to Grey. After a 45 minute break, I started hiking towards Grey. The trail was generally pleasant and I especially liked hiking through a big stretch of forest. On the way, I crossed 3 long bridges which were rather unnerving but I managed to keep it together.
The second bridge. Gasp!
I arrived at Refugio Grey at 3.45pm – a lot earlier than I expected! All in all, except for some sections when my knees screamed for me to stop, today was Type 1 fun and will be recorded in my books as one of my best days of hiking.
Note: The Grey glacier (part of the South Patagonian Icefield) can be seen for much of the way down. There is no need to stay too long at the pass to soak it all up. Keep walking to get out of the exposed areas as soon as possible. New perspectives of the glacier will reveal themselves.
Day 5 – Refugio Grey to Refugio Paine Grande
Refugio Grey was a dream. A comfortable bed with a luxurious comforter – exactly what I needed. The bar also served many types of cocktails in addition to the usual beer and wine. I took the liberty to have a Pisco Sour. The night wasn’t so great. My roommate mumbled in his sleep and I also dreamt that I was drowning (gasp!), which woke me up in shock.
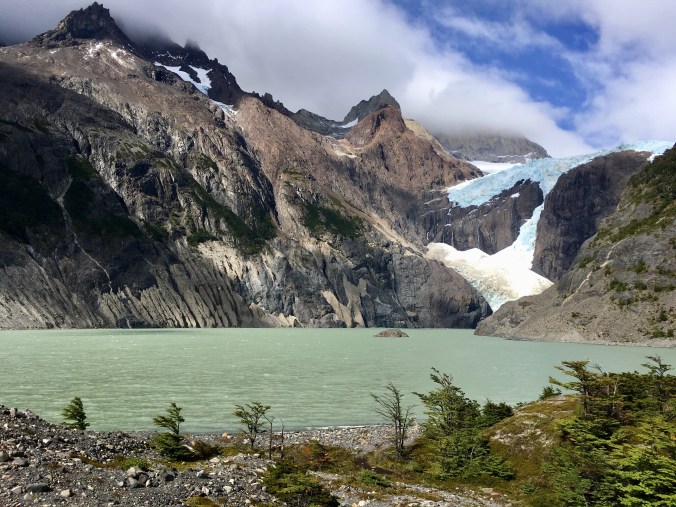
I went kayaking to the Grey glacier today. The wind gusts were still fairly strong, which delayed our departure and worried me a little bit. I still had to hike to Paine Grande in the afternoon! I was reluctant to be too worn out before the hike and considered bailing but decided to go ahead anyway. We finally launched the kayaks at about 10am and the first few minutes on the water were super windy, which made me want to turn back immediately. How am I going to survive this for 2 hours?? Aaahhhh! Thankfully the wind died down eventually. The icebergs floating in the bay glowed blue and looked gorgeous but they were also an obvious visual indication of the glacier receding faster than usual due to climate change. It is beauty that I would rather not see.
Kayaking in front of the Grey glacier
Back on land, I took a quick lunch of beans, rice and potatoes (yay carbs!) at Refugio Grey before hiking on. Fueled by all the carbs, I hiked fast. The trail climbed a hill and that was when the wind picked up. Soon it began gusting consistently, pushing me forward and sideways. Some people enjoy being tossed about by the wind. I do not. The wind makes me feel very uncomfortable and makes me innately want to hike on and not linger for more than a moment. For that reason also, I hiked even faster and got to Refugio Paine Grande in under 3 hours without a snack break. This night, I had a couple of drinks with mates from the O circuit.
View from the bar at Refugio Paine Grande
We are now firmly on the ‘W’ part of the trek and have different schedules going forward so likely wouldn’t see each other again. The night ended with 3 of us standing outside in the cold and alcohol haze, having a good conversation (which I can’t remember much of due to said alcohol haze) and appreciating the Milky Way.
Day 6 – Refugio Paine Grande to Camp Los Cuernos
I woke up with a mild hangover from last night. I took my time preparing and finally started walking at 9.30am.
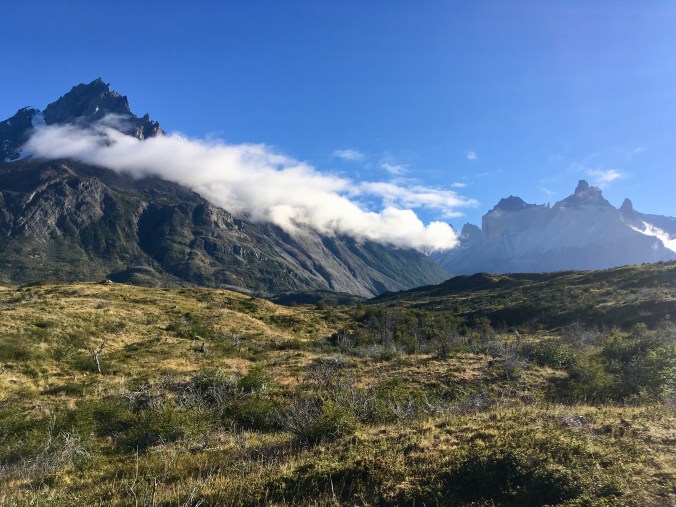
Sublime view early in the day
Most people staying at Paine Grande would aim to hike to the Britannico lookout today and then either camp at Camps Italiano or Valley Frances or return to Paine Grande. I was hiking on to Camp Los Cuernos with no intention to go to the lookout. I had already gone to the first lookout the last time I visited the park and thought the view was underwhelming for the effort it took to get up the rocky trail. Also, there were hoards of people going to the lookout. Walking from Paine Grande to Italiano, I was bothered by the crowds on the trail, after being spoiled by the relative solitude on the ‘O’. I hung back and let people pass whenever I heard someone coming up behind me. At Italiano, I turned right to get on the trail to Los Cuernos and it was immediately a lot quieter as by this time, many people were on the trail to the lookout.
The all-around view on this section of the trail was spectacular, comprising of the view of the lake on one side, the hanging glacier on another and the Cuernos del Paine on the third.
Glacier
Lake
Cuernos Del Paine
In fact, it was almost the same view that one would see at the lookout! The only difference being that, at the lookout, one would be closer to the hanging glacier with a chance to witness some avalanches. That, to me, is certainly not worth the extra effort to get to and from the lookout and I would have been quite pissed with myself if I had gone.
The trail became rather annoying in the last hour or so, winding through a rocky beach. I reached Camp Los Cuernos slightly after 2pm. It’s a pretty campsite by the lake. WiFi is relatively fast and there are plenty of people here – another reminder that I am well and truly back in civilization.
Day 7 – Camp Los Cuernos to Refugio Central
Today is the ultimate lazy day. I only had to walk for about 3.5 hours to Refugio Central. If I so wish, I could bus back into Puerto Natales today. But there is one more objective left to achieve on this trip and that is to see the Torres Del Paine (i.e. the towers) themselves for the second time! Unlike the French Valley lookout (which I think is overrated), I think the towers are definitely worth seeing again.
The trail out of camp started climbing immediately. In true relaxing fashion, I deliberately walked slowly. Following the initial climb, the trail pretty much undulated all the way to about 45 minutes from the Refugio when it became mostly flat.
Last view of the magnificent Cuernos Del Paine
Laguna Inge
On one of the descents, I slipped and my left knee bent and hit the trail with my full body weight on it. Ouch! Who falls like that? I was expecting any falls to be on my butt where there is much more cushion. Luckily nothing broke – just a knee scrape. Phew. Still hurts though so after the fall I walked even slower, reaching the Refugio at about half past noon. Now the temptation to bus back to Puerto Natales today is even greater but I can’t let a knee scrape get me down. Bright sunshine is in the weather forecast for tomorrow so it would be an ideal time to see the towers. The celebratory dinner back in town would have to wait.
Day 8 – Refugio Central to Puerto Natales
I woke up to my knees hurting. In fact, I felt sore through the night. A bruise over my left knee cap is also starting to show. I suppose this is more than a mere knee scrape. I could still walk and with some effort, I am confident of making it to the base of the towers and then to Chileno to spend the night. But will I enjoy it? Is it worth it? Would this impact my upcoming backpacking trip in Bariloche? Those are the questions.
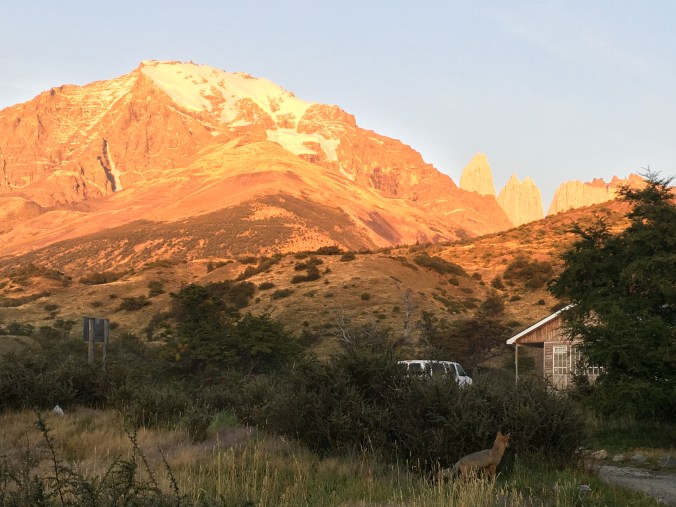
I decided not to answer them till after breakfast. The breakfast room at Refugio Central provides a clear view of the top of the towers. As dawn broke over the towers, I went out and stood in the cold with my camera. It was the perfect sunrise – this was the morning to be at the base of the towers. Then a fox appeared, with its bushy tail set against the backdrop of the glowing towers.
Sunrise with fox sighting!
It all seemed so complete and at that time, I just knew, it was enough and it was time to leave.
What I do remember from the time I hiked to the base of the towers in December 2014 was that the trail ascends the whole way. Past Refugio Chileno, you would enter a forest and remain there for a bit. Once you exit the forest, it’s a steep and rocky path I didn’t like at all that would lead you all the way to the base of the towers. Apparently the entire trail from the welcome centre to the base of the towers is also now seriously damaged from overuse and the park is building a new trail.
Base of the towers, December 2014
Epilogue
In two visits, I have now pretty much seen the park in its entirety. I have been really fortunate with the weather this time around – 8 days with not a drop of rain! I don’t think the hike would have been as enjoyable in bad weather. Still, I would definitely recommend the ‘O’ circuit over the ‘W’ for those who crave appreciation of nature in relative solitude. To those planning a trip to the park – I wish you ‘happy trails!’.
This past August I travelled to Peru on a mission to hike the Cordillera Huayhuash. I can’t remember where and when I first learned about the existence of this place but I remember thinking to myself, “how did I not know about it before this?!”
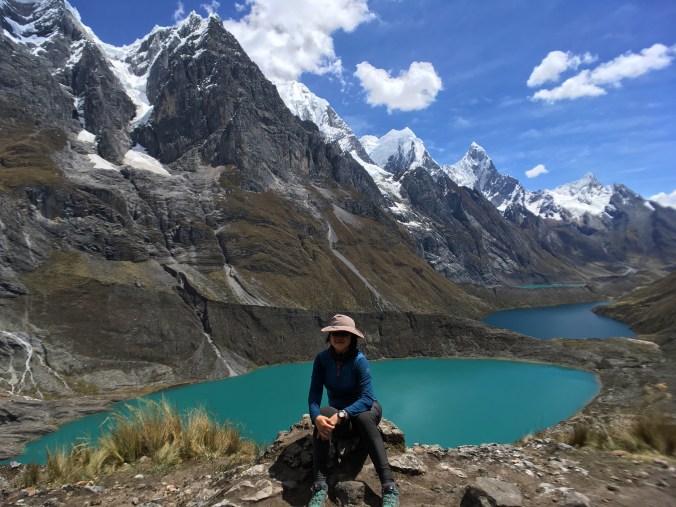
The Cordillera Huayhuash is a small-ish mountain range in the middle of Peru that forms part of the Andes. Its peaks are so precipitous that many of them are the stuff of mountaineering legend (like the dramatic adventure the author of the book “Touching the Void” had on the Siula Grande). For the rest of us mere mortals, it would suffice to gaze at these wondrous sights from a safe distance below.
(Me posing in front of the famous 3 lakes of Huayhuash)
The Huayhuash Circuit is a trail that goes around the Cordillera Huayhuash. I walked it in 10 days but it can be done in in 5 – 12 days, depending on your pace. Unlike its bigger Cousin, the Cordillera Blanca, the Cordillera Huayhuash is not a national park. Instead, its trails and campsites are maintained by the local villagers (who have even built flush toilets in the wilderness!) for a small fee.
The main trail is also used by donkeys and their drivers, who carry in supplies for hikers. Is the trail independently do-able, you ask? Yes – with a GPS, good sense of direction (or just following the donkeys and their poop) and a willingness to carry 10 days of supplies, it can be done. But why do that when there is a better option? There are many alternative routes that veer off the main route and lead to more scenic spots that are difficult to find on your own. That’s when a guide will come in handy. It also doesn’t hurt to have pack animals carry all your gear and food. Most of the trek is above 4000m so it might be wise to take some load off and focus all your energy on walking and breathing. I went with the company, Eco-Ice Peru, that operates out of the nearest “big” town, Huaraz, and it was perfect.
Many intrepid hikers have heard of the Huayhuash Ciruit. I know because it is a topic that comes up now and then on the hiking Facebook groups that I’m a part of. But it never ceases to amaze me how the general population has never heard of this place. It’s not even on Nat Geo’s top 5 places to visit in Peru for crying out loud! Machu Picchu and Cusco may be impressive and must be visited on a trip to Peru. But they are man-made wonders, which in my definition, cannot be compared to the timeless quality and enchantment of the Cordillera Huayhuash.
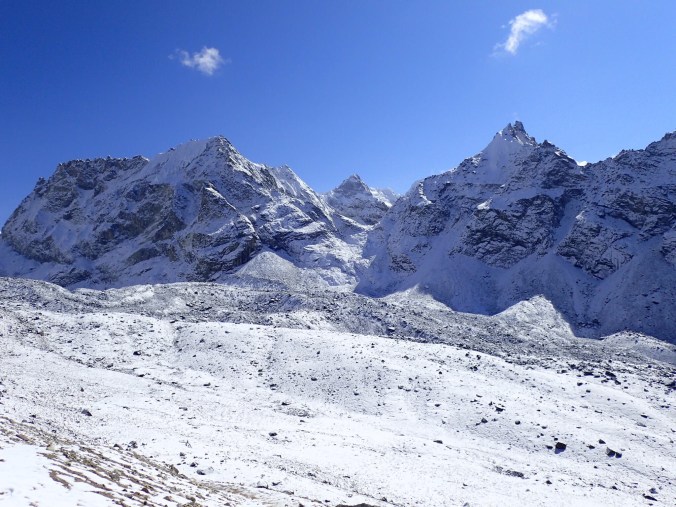
Wow it has been almost 2 months since I returned from Nepal and less than a month before I begin my journey to Peru on the other side of the world. People often associate Everest with Nepal but only true outdoor enthusiasts would have heard of the Cordillera Huayhuash which is where I’m heading to in Peru (the first question that literally everyone asked me when I said I’m going to Peru is ‘oh so are you going to Machu Picchu?’ as though that is the one and only attraction in Peru). However, that doesn’t make the Cordillera Huayhuash less commanding of respect by those who make the pilgrimage.
In Peru, I would be spending most of 2 weeks above 4,000m and there are a lot of lessons I learned in Nepal about trekking and living at high altitude that I hope will carry me through another successful expedition. I wrote the following ‘tips for surviving a high altitude trek in Nepal’ at the end of my trip and am sharing it here now both as a source of well-meaning advice and a note to self should I ever forget:
On the way to Cho La pass, which is the highest I’ve ever been at 5,420m
– Prepare your stomach with probiotics
– Go vegetarian. Eggs are fine too. All meat is brought up from lower elevations on someone’s unrefrigerated back
– For the same reason, avoid dairy. Unless it’s locally made stuff like yak cheese
– Drinks lots of water, preferably hot, and eat lots of carbs to stave off acute mountain sickness (AMS)
– Don’t freak out at every small symptom of AMS. Most people get at least a mild version of it that can go away as you acclimatize
– Pack as many rolls of toilet paper as possible. It is a precious commodity. 1 roll costs upwards of 2usd and the price rises the higher you go
– Don’t buy bottled water. Keep plastic waste off the mountains. Purify your tap water using a UV water purifier called Steripen
– Bring a hot water bottle and fill it up with boiling water to hug to bed on those cold cold nights
I was asked a number of times in the past, if I like hiking so much, why I never visited Nepal, which is undoubtedly the trekking capital of the world. The truth is the multitude of trekking options in Nepal made it difficult for me to decide on the first one.
I was first captivated by pictures of a panorama of mountains and aqua blue lakes stretching into the horizon that can only be seen from atop Gokyo Ri. Extending the trip to Everest Base Camp was an afterthought – it was only later that it sunk into me what I was committing to undertake.
The physical and logistical preparation for the trip over the last couple of months was the most I’ve ever done. It is this preparedness that allowed me to focus on the most important aspect of the hike – the mental discipline to live a routine for 2 weeks to get up and get going, no matter what.
The Khumbu valley is a holy land. And this can be felt in every ray of sunshine reflecting off a white giant, every scent of juniper, every birdsong and every snowflake. The Maker’s presence and the balance of creation is evident. One would only have to look, smell and listen.
The people of these mountains are generous, kind and genuine. Always ready to help and give their all without asking anything in return. Life is tough in these quarters but they make the best out of it with a smile.
In all, this was an experience that challenged me to my limits and enriched my soul. I couldn’t have done it any sooner as all the lessons learned in multiday hikes before were used by me to avoid trip-ruining pitfalls and to problem solve with ease. This was the right time. And it was the best time.
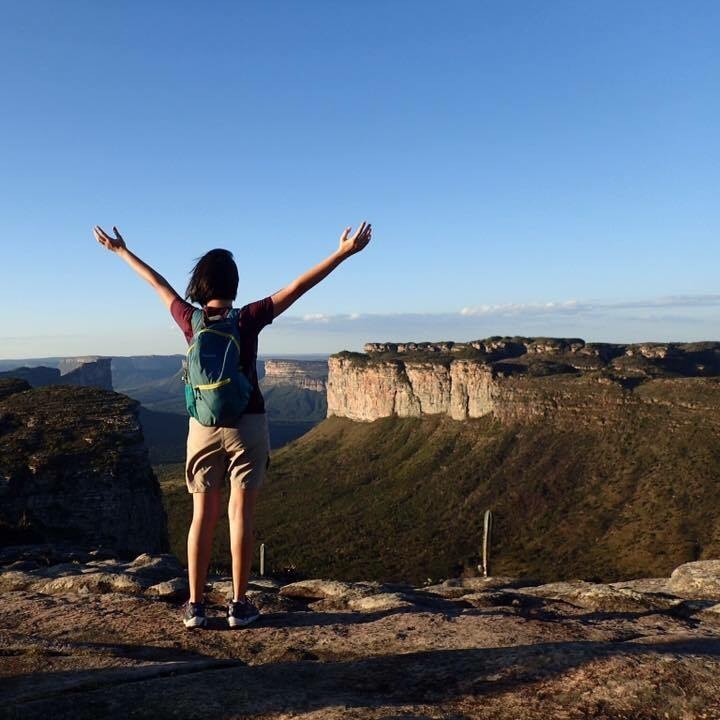
I was planning a 3 week holiday in Brazil and looking to go hiking for a couple of days. The Chapada Diamantina turned up in my searches as one of the prime hiking spots in Brazil.
How long is the hike?
I spent 3D2N covering the main sights in the valley and stayed both nights in the same guesthouse, carrying only a change of clothes and some necessities as food and bed are provided for. You can spend several days covering more ground off the beaten path if you’re willing to carry food and camp.
What’s the trail like?
The trail is well established, although unmarked, and is commonly used by the local villagers to get into and out of the valley.
How do you get there?
The town of Lencois, itself a 7 hour bus ride from Salvador, is where most hikers stay the night before and tour companies operate out of. From there, it is a 2 hour drive to the trailhead.
Did you use a guide?
Yes. I went with Diamantina Mountains. It’s run by Pieter, a Belgian guy who settled in the area, and his Brazilian girlfriend, Louise. They and the guides they use are a great, genuine, bunch of people. Can’t recommend them enough!
What do you like most about this hike?
The valley is lush with greenery and lightly trafficked. Gives a real sense of being in nature. And yet a hearty meal, warm shower and comfortable bed awaits at the end of the day at one of several lodges run by villagers. The villagers used to service the mining community when the area was still a diamond mine (hence the name ‘Diamantina’). Later, they were convinced by the hiking community to stay put and service the hikers coming through.
Would you go back?
In a heartbeat! If only it doesn’t take so long to get there.
Assuming we live for 85 years, we have about 60 years (discounting 15 years at the start and 10 years at the end) during which we have to travel to all the places we want to see before we die. Assuming again that we can take time off work/school an average of 3 times a year, that leaves us with 180 opportunities to travel. That’s not much – just less than 20% of the famous “list of 1000 places to see before you die”. Which means that if you have a travel bucket list and you’re serious about achieving it, you better get off your ass and get going! But society (and self doubt) has a way of nagging at your ear to put that travel bucket list on hold, most of the time indefinitely. Myths about the dangers, cost and selfishness of travel are perpetuated to deter those with less resolve. Here are some of the biggest myths which I will attempt to debunk:
1) No time
Most working adults have some off day entitlements ranging from 2 to 6 weeks. And yet I’ve heard ‘no time’ for a sorry excuse to not travel many many times. The real problem is not ‘no time’ but not knowing how to use that time to travel when the opportunity presents itself e.g. when you’re suddenly forced to clear leave at the end of the year or when you’re in between projects. During these times, the excuse evolves from ‘no time’ to ‘I don’t know where to go’. Well, here’s how to get around that problem. They say luck is opportunity meets preparation and there is no truer statement in this context. Plan ahead: I keep an excel workbook which contains my travel bucket list with notes on the best month(s) to travel to each place, a 5 year travel plan and brief itineraries for each place. That way, when I suddenly have say 2 weeks in May freed up, I know exactly where to travel. Never let your lack of preparation hold you back on your travel goals.
2) No companion
Here’s a revelation that my friends will find surprising about me: I like having travel companions and travel solo only when I can’t find anyone to come along with me. Humans are social creatures – we all crave and need companionship, some more than others. But we also have different schedules and life priorities and therefore cannot always be there for one another. Your friends/family members might not be available at the precise period you have to travel or even be interested in where you want to go. Don’t let the priorities of others dictate your’s. If you’ve never traveled solo, now is the time to try. You’ll feel scared, worried, liberated and empowered at the same time – these feelings are all very normal. If you’ve tried it and swear that it’s not for you, reconsider if you spent most of your time when traveling solo wishing your loved ones were there with you. If you did, that was a futile exercise and I implore you to try again. Extroverts may find it harder to travel solo but introverts can all identify with the inner peace and introspection that comes with solitude. Plus you’ll get to meet other solo travelers just like you!
3) No money
Ah the no money excuse. Yes we can all do with a lot more money but until we find a way to have infinite amounts of money, we need to learn how to allocate the limited resources we have effectively. There are ways to travel cost effectively (see my previous post) and there are ways to save up (consider not buying so many handbags, clothes, tech gadgets etc. and not eating out at expensive restaurants). Some people have the idea of putting off all their travels until retirement when they expect to be sitting on a pile of cash. There are several problems with this theory. Firstly, how do you know you will live to see retirement? Secondly, if you retire at 65, that leaves you with only 10 – 15 years to travel and there are many things you wouldn’t be able to do or do as comfortably at that age as compared to your younger days. Thirdly, ever heard of inflation? A trip that costs $2000 today will cost 2 to 3 times more later in your lifetime. Simple math.
And remember : It’s always possible to make more money but youth, once lost, is lost forever.
It was raining rather hard outside and we were about to leave the cozy confines of the carpark building to walk 45 minutes to the Thrihnukagigur volcano. The walls of the building were lined with bright yellow, oversized raincoats and we were told by our guide to pick one and put it on. Walking in that raincoat would not be pleasant. It would be cumbersome and we would be all sweaty inside.
“We don’t need to wear this; we all have rain gear!”, we protested.
Our guide looked at us and deadpanned “this is Iceland. Nothing but rubber is waterproof.”
Rain jacket basics
It is true that nothing but rubber is truly waterproof and that’s an important point to keep in mind when deciding on what rain jacket to buy. Almost every brand of rain jacket in the market touts itself as waterproof. Be skeptical, be very skeptical. Remember, nothing but rubber is waterproof. So are you supposed to wear a rubber rain coat for hiking in the rain? No. Because so much of your own sweat will be trapped beneath the rain coat that you might as well have been drenched by the rain (and risk hypothermia).
The aim, when choosing a rain jacket, is to select one that is water-resistant, breathable, lightweight + packable and as I’ve come to learn, durable.
Water-resistance is measured in terms of the water pressure beyond which the jacket will leak. A sufficiently water-resistant rain jacket should have a waterproof rating of at least 10,000mm. If water-resistance determines how much water (rain) is likely to get in, breathability determines now much water (sweat) is likely to get out. Breathability is measured in the amount of water that passes through one square metre over a 24 hour period. This page here discusses waterproof ratings and breathability in greater detail.
A durable rain jacket is one that will retain its water-resistance even after many washes. For years I relied on my Marmot Precip rain jacket to keep me dry but over time the fabric lost its water resistance and left me drenched after hiking in it in a downpour. Thanks buddy. A lightweight jacket goes a long way in reducing the weight on your body as you walk. You’ll also appreciate a jacket that packs really small and takes up little space in your bag. Trust me.
Good to haves: Most people forget about the zips on the jacket but water will leak through zips unless it’s sealed with a waterproof coating. Otherwise you’ll end up dry except with a strip of water down the front. Storm flaps also help to prevent water from leaking through the zips. A hood that extends beyond your face is good for keeping some of the wind-driven rain off your eyes. Pit zips are a very useful feature for venting those sweaty arm pits. Zippered pockets are highly recommended for stashing away your freezing hands and phone/small camera.
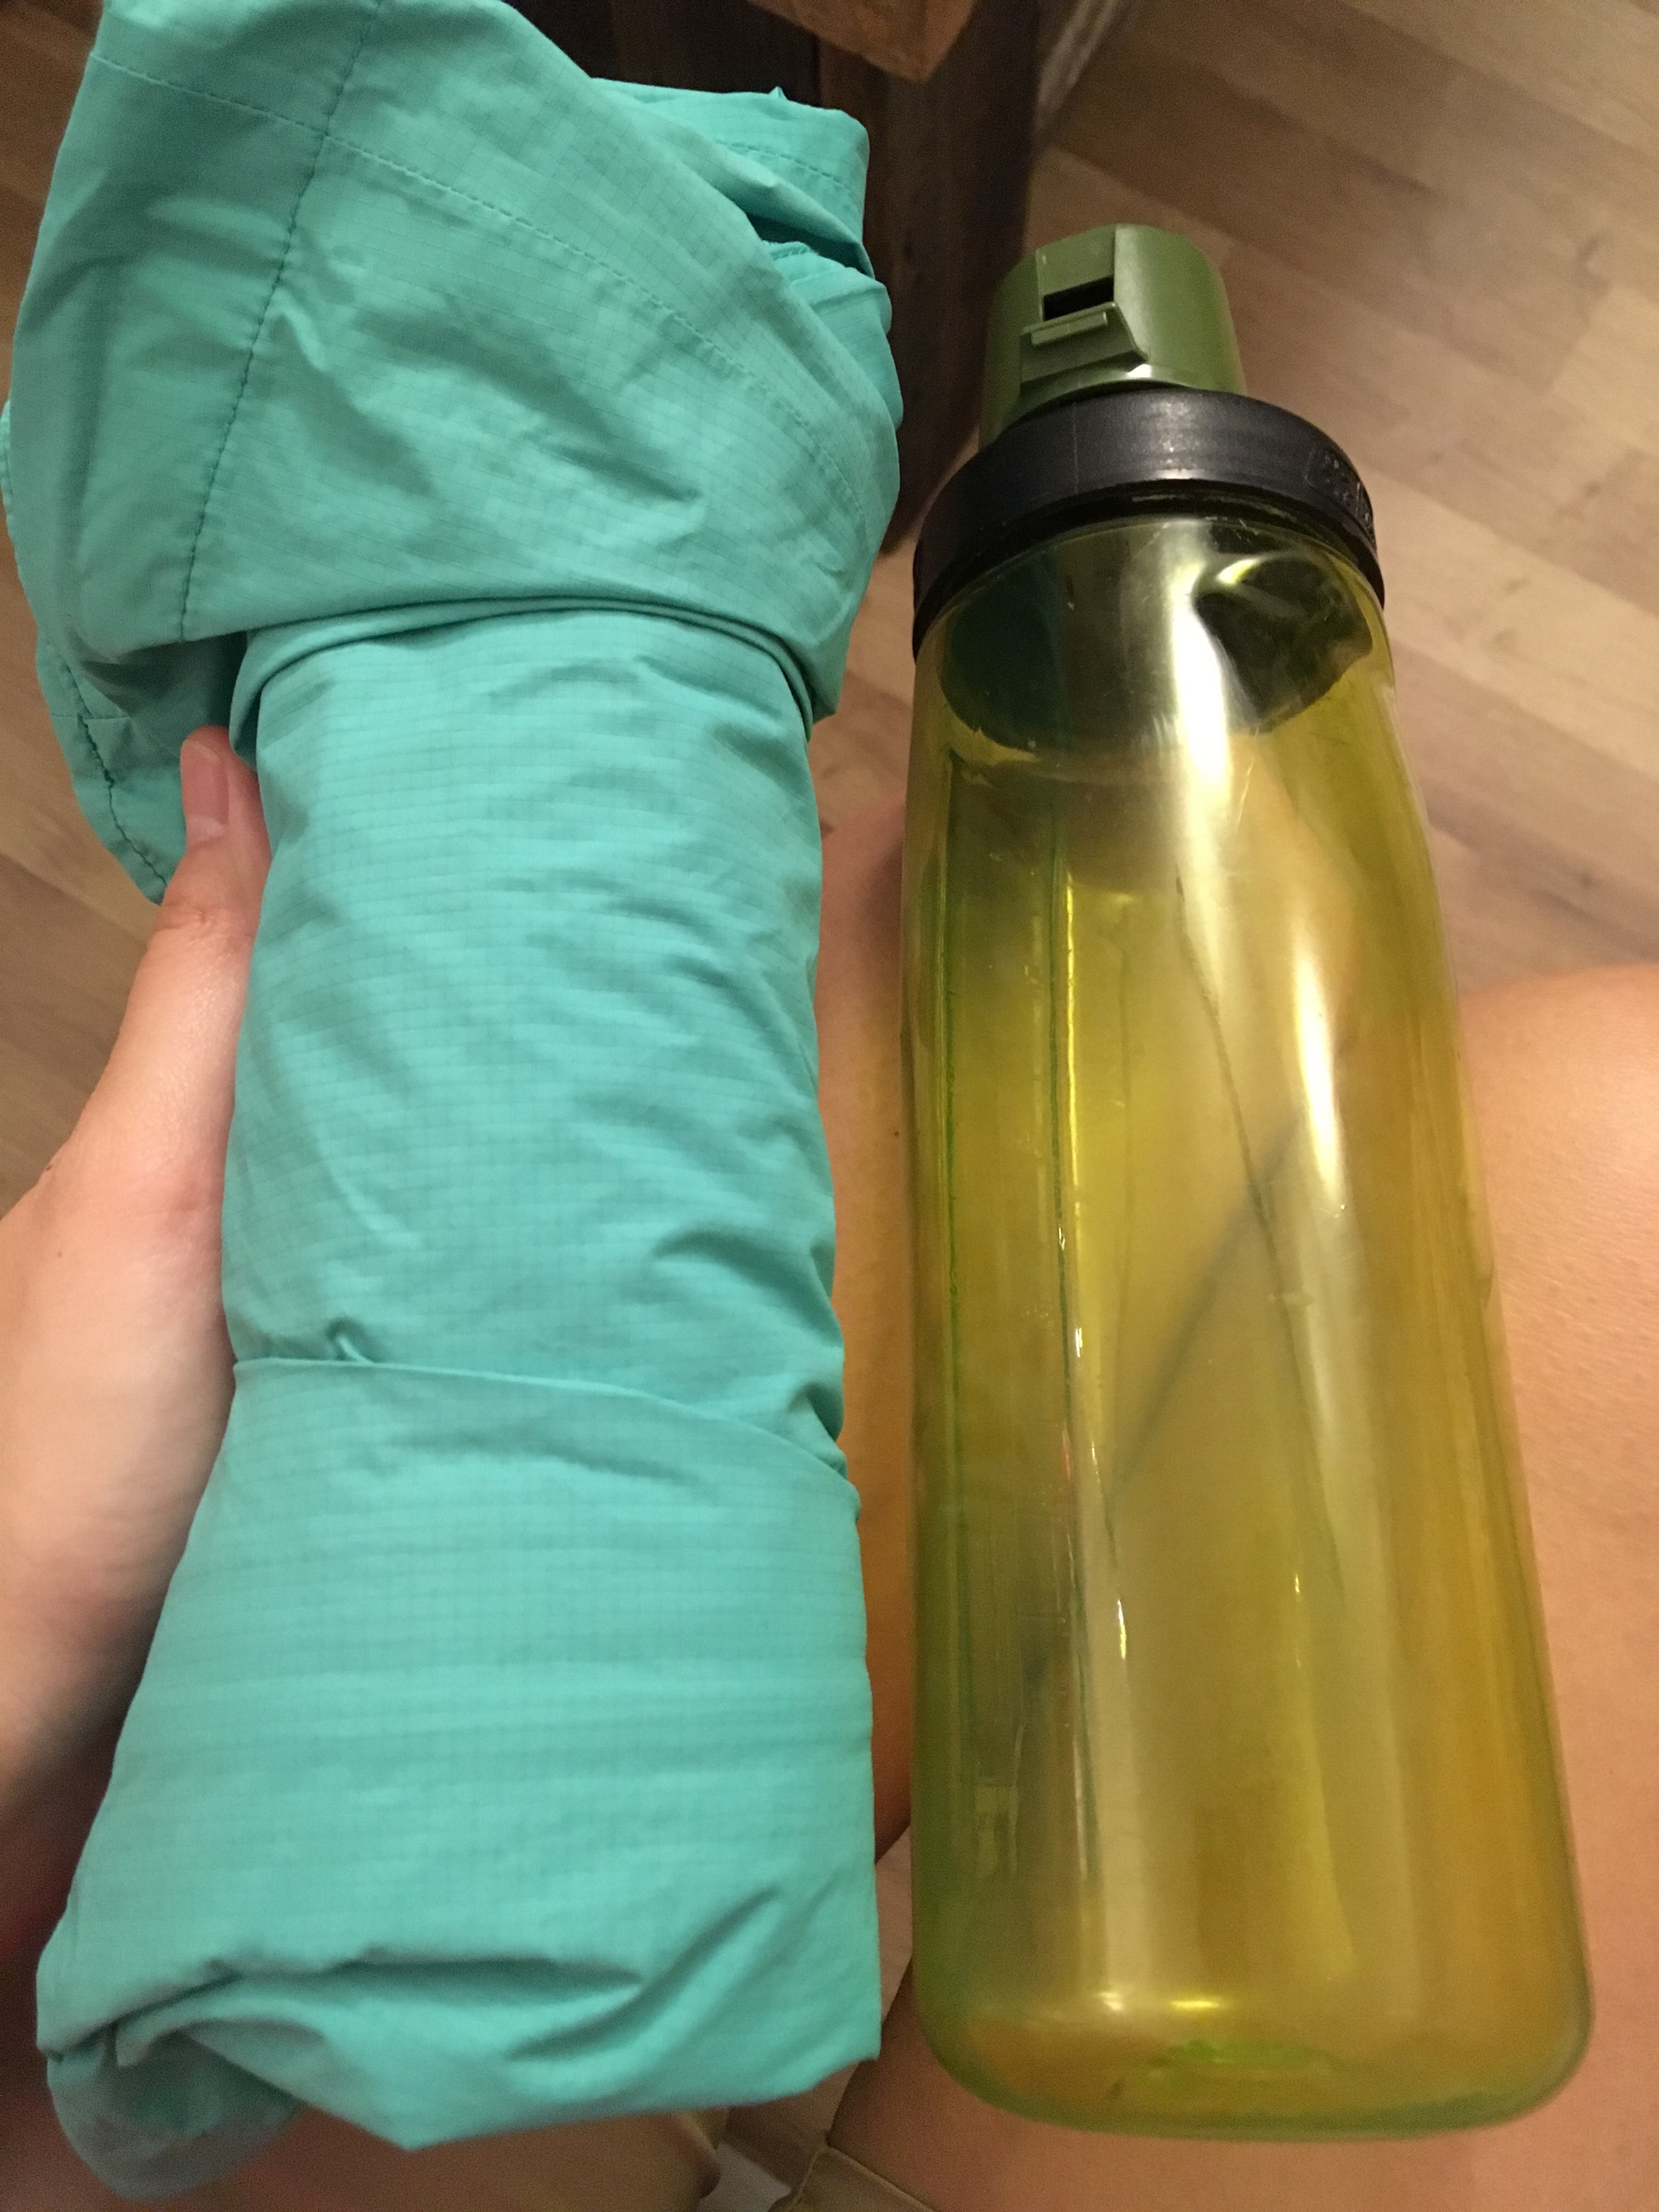
Comparison of the Marmot Minimalist and Mountain Hardwear Plasmic Jackets
I’ve owned (and used) the Mountain Hardwear Plasmic jacket for 2 years now. I got it as a replacement when my old Marmot Precip failed. It’s the one on the right in the picture above. I like it because I’ve not encountered a leak so far even after sustained periods of rain and numerous wash cycles (points for water-resistance and durability!). It is also very lightweight and packable and rolls up into a small bundle the size of a bottle.
What I don’t like is that the zips are not storm-sealed, which means water can leak through the zips although I’ve only encountered that problem when I sprayed the zips with a showerhead. But be prepared for some leakage and a potential wet strip down the front if hiking in this jacket under strong windy and rainy conditions. I also feel sticky with sweat almost half the time I’m wearing it so I don’t think the fabric is all that breathable even though it’s supposed to have good breathability according to the manufacturer specs (15,000).
One thing I really miss about my old Marmot Precip is the storm flap over the zips. I just felt a lot more assured knowing that rain wasn’t going to leak through that way. But I didn’t want to buy another Precip knowing that the material is not durable (makes me feel like a sucker if I did buy!). And so I bought the Marmot Minimalist (left in picture above) which is constructed just like the Precip except with pit zips (hooray!) and with the Gore-Tex Paclite fabric which boasts a whopping waterproof rating of 28,000mm (vs. 20,000mm for the Plasmic) and a breathability of 15,000 (same as the Plasmic). It’s my first Gore-Tex jacket so I’m super excited. It’s heavier and packs bigger than the Plasmic but not much more. I can’t say anything about its breathability yet because I haven’t tested it on the trail but I sure hope that it’ll be better than the Plasmic even though they have the same breathability numbers (will update this post when I return from testing it on the West Highland Way next month!).
A good friend asked me today for advice on traveling cost-effectively so that he can spread out his travel budget over more trips. “Cost-effective” and not “cheap” is the word because you’re on vacation afterall. It’s utterly pointless to make yourself miserable by penny pinching on e.g. food by eating instant noodles and stale bread when you can be enjoying the local cuisine and knocking back a few margaritas. So here are my top tips on how to roll back on the excess and make use of your limited budget more effectively:
Ditch the hotels and embrace the hostels
After the age of 25, we tend to turn our noses up at hostels. Well, think again because many modern hostels are so well managed that they are no different from a cozy B&B. Sure, it’s nice to spend a few days at a luxurious seafront resort but most of the time, you just need a clean, safe and quiet place to crash. Private rooms are available at hostels for a fraction of the cost of a hotel room (Caveat: In my experience, this is true for Europe, US, South Africa, Australia and New Zealand. Not always true for South America and Asia). The trick is to book way in advance as there are usually only a few private rooms available (the rest being dorm beds). With reviews on Tripadvisor, Google and Facebook, it’s easy to separate the top-end hostels from the dingy ones. Which brings me to my next point.
Always research accommodation, tour providers and airlines before booking
Researching accommodation, tour providers and airlines before booking allows you to select only businesses you (and others) trust, potentially saving a lot of headache during the trip AND costs due to e.g. vendor defaults, unacceptable lodging situations and airline schedule changes. Sure, there are a lot of “rant posts” on review websites that only reflect the peculiar experience of one individual. The crux is to identify patterns and key messages among the list of reviews in order for you to make your own decision on whether or not a business is to be trusted.
Stretch your mileage
I enjoy collecting airlines miles on my credit cards and frequent flyer program and enjoy redeeming them to get major savings on my flights even more. But that’s not always the case. You still have to pay airport taxes and surcharges after using your miles to redeem the ticket fare and with airfares at an all time low, sometimes you only end up saving a measly $300 after spending tens of thousands of miles. Use your mileage to redeem flights for which there is a low airport tax to airfare ratio and which still works out to be better off for you financially compared to your next best alternative flight option.
Some people like traveling to places of historical significance. Some people like to spread themselves out under the sun on a private beach. Some like to go anywhere where a hard bargain can be driven and a Tshirt can be gotten for $5. I like to go to places that I read about as an eager geography student in secondary school.
Until 2 years ago, I never knew it was possible to visit Krakatoa. All I learned as a teenager was that Krakatoa was a super volcano that erupted in 1883, killing loads (36,000 according to Wikipedia) and causing the most extensive worldwide climatic change event in modern times. Then I came across an article online (the original article can no longer be found but this is a good alternative) chronicling a 2D1N camping trip on the island. Getting there wasn’t easy. It’s 3 hours drive from central Jakarta to Carita Beach and from there another 3 hour harrowing boat ride on a fast boat to the island. But I wasn’t going to let that stop me! After much cajoling from me, 4 friends agreed to indulge my insanity.
And was it worth it? Damn, it was. Turns out we were going to Anak Krakatoa, literally the “child of Krakatoa” which rose like a phoenix from the depths of the Earth when the original Krakatoa blasted itself apart violently (that’s an understatement), leaving only 3 land masses behind as a reminder of its existence. Here’s Anak Krakatoa:
We went snorkelling right where this picture was taken and were marvelling at tiny bubbles in the water. Turned out they were sulphuric acid bubbles that left painful red gashes on the skin. Yikes!
We were the only campers on the island so it was exactly like having our very own private island (at a bargain I must say!)
Dinner was a sumptuous meal characteristic of Indonesian hospitality. Grilled fish, stir fried veggies, steamed rice, tempeh, cut fruits! I am always amazed at what you can whip up in the wild with some determination.
We hiked up the volcano to catch the sunrise the next morning. The furthest we could go was about 2/3 way up because Anak Krakatoa was at Alert Level 2 which means mama’s not happy and you don’t want to get near the fumes at the top. The view from high was stunning and here you can see 2 pieces of the old Krakatoa:
Later that morning, we packed up and went back the same way we came. The short 2D1N trip felt more like a very compressed week with so much action and sights to take in.
And of course, a very good geography lesson.
How to go:
Fly to Jakarta and stay overnight. Be up at 4am and drive/be driven 3 hours to Carita beach. Hop on a fast boat and it’s another 3 hours to Anak Krakatoa. There are many tour providers who pick up from Jakarta. We went with these guys who are reasonably priced and know their stuff. But bring your own snorkelling mask.